In Part 2 we are focusing on the photo itself. There are many good tools to use when doing this sort of thing, but the three to keep in mind are the clone stamp, healing brush, and patch tool. Mom helps me get the details right as we re-create a lot of the photo.
Black and white hold a special place in photography. A good black and white image is not just a desaturated colour image. There are many additional considerations that need to be addressed. In this tutorial, let's look at how to think in black and white.
1. Identify the Important Details in the Scene
2. Understand the Limits of Your Tools
3. Consider Light, Style, and the Images Available to You
4. Assess How Colours Will Be Rendered as Monochrome Tones
173 Sud's insight:
To capture the best black and white images, you need to understand how a scene is recorded and rendered as a range of tonalities, without colour.
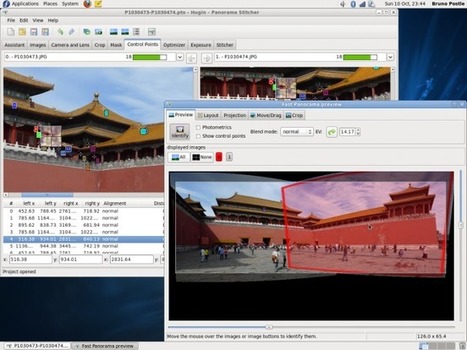
Si vous n'êtes pas satisfait du mode panoramique de votre appareil photo, vous pouvez aussi assembler vous-même une série de photos d'un même paysage, grâce à Hugin, une application libre dispo sous OSX, Windows et Linux.
Vous importez vos photos, vous jouez avec les angles, les superpositions et le cadrage et y'a plus qu'à exporter. Je trouve qu'en général, les appareils photo ou les smartphones font du bon travail en terme d'alignement mais niveau qualité d'image, on perd pas mal. Là, au moins, vous partez de vraies photos haute résolution et vous pouvez les assembler aux petits oignons pour avoir un résultat immersif ou panoramique parfait.
A solid understanding of light can make you stand out from an average photographer. In fact, in portrait photography, light is even more important than the subject and location. This is because without the proper use of light, you can ruin the shot, even with the best looking subject, at the most awesome location in the world!
In this article, I’m going to break down the understanding of Light for you into six simple terms. Once you understand and apply these concepts, you will immediately notice the improvement of quality in your portrait photographs.
The six principles of light are: intensity, dynamic range, direction, diffusion, White Balance and reflection.
1) Intensity of Light Intensity is the brightness level of light and it brightens up your subject. For both natural light and studio light, you can modify the light source to change the intensity. I’ll cover the basics of light modifiers later, but the most important fact about intensity is that the distance between the light source and your subject has a massive impact on the intensity of light.
2) Dynamic Range
Dynamic range and stops have a very close relationship. Dynamic range is the difference between the lightest and darkest tones of an image, and a stop is the measurement of this range. Since a stop measures light in representation of numbers, what’s the relationship between the two?
3) Direction of Light The position of your light source is very important because it determines how light hits your subject. It has a great affect on the quality of your photograph and a few small inches of light misplacement could bring your shot down to a snapshot.
4) Diffusion of Light Diffusion relates to hardness and softness of light. It also determines the intensity of the shadow. As a general rule, the bigger the light source and the closer it is to the subject, the softer the light.
5) White balance White balance is the color temperature of your camera’s setting. Matching the right color temperature in the environment you are shooting is very important. This is how you remove an unrealistic colorcast, so that your photograph represents true color that you see in real life.
6) Reflection of light Light has one very distinct behaviour; it travels in straight lines. Which means no matter whether you are using natural light or studio light, it is only going to travel in one direction until it reaches a surface.
Once the light reaches a surface it reflects off at the same angle it hits. The amount of light being reflected is going to be determined by the color and texture of the surface.
If you’re bored of the photographs you’re taking, perhaps it’s time to be a bit less serious. So forget about ISO settings, shutter speed or lens choice—and be a bit silly instead.
These tips from the Co-Opeative of Photography aren’t at all complex, serious or expensive, but they are fun. Light painting! Smashed mirrors! Free lensing! All worth giving a go. Why not show us n the comments if you’ve tried these kind of techniques out before?
Watch photographers Anastasia Ehlakova & Julia Gebhardt demonstrate some funky photography tips to try out on your next shoot!
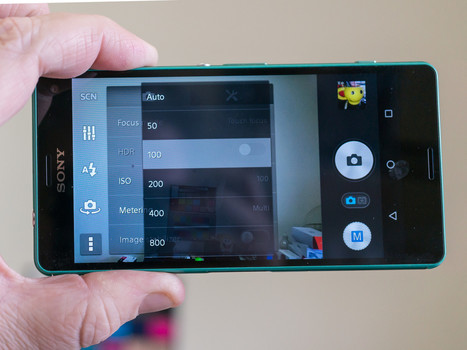
Your Android probably has a decent camera right out of the box. If you never touch any of the settings, and remember a few basic techniques to get great pictures, you'll probably get those great pictures. But you can take things a step further by mastering a few basic controls in your camera app.
Knowing a bit more about how and why the basic camera settings work will give you better pictures under a wider range of conditions than using the defaults will. And the best part? It's all pretty easy to get a handle on.
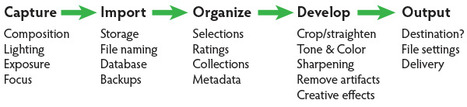
For every serious photographer, capturing an image is only the beginning of a complex process with numerous pitfalls. So how can you streamline this tangled mess? The key to keeping your digital photography fun and productive is to adopt, and adapt, an effective, consistent workflow.
Why workflow matters
The concept is simple – your photography workflow is the sequence of steps and actions you take to edit your photos, work them up to a result you consider finished, and share them with the world. Editing photos can be like baking a cake or assembling flat pack furniture. You start with raw ingredients, or loose parts, and use an ordered sequence of steps to put the thing together. In a good photography workflow, the end result is a perfectly crafted image, securely stored for future use, all with the least possible effort.
Efficiency is important. Without a good workflow, at minimum you’re wasting time. Worse, you run the very real risk of losing your most precious photos. Forever. A couple of years ago I knew a wedding photographer, then aspiring to become professional, who lost an entire wedding shoot because of relatively simple errors in her workflow. (In short, the mistakes derived from a convoluted importing method and totally inadequate backups.)
Maybe you’re only taking pictures for fun? If you’re planning to continue with photography, you still need to use an effective workflow. If you don’t, your photo archive will become a beast, very difficult to tame. And your images won’t look as good as they could. No fun.
When you’re starting out in digital photography, you need to develop good habits early. Even if you’ve been shooting for years, it’s never too late to improve your process.
You can craft your digital photography workflow to suit your own situation and preferences. But every effective workflow shares common tasks, proven techniques and best practices. These established methods have evolved with real-world use across all genres of photography. They apply equally to beginning enthusiasts and seasoned pros.
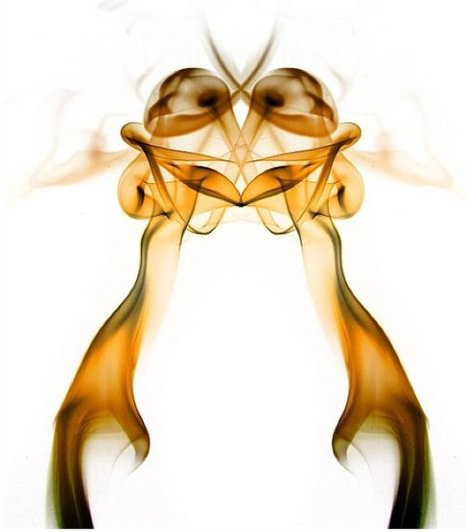
In this post we present useful photographic techniques, tutorials and resources for various kinds of photography. You’ll learn how to set up the perfect environment and what techniques, principles and rules of thumbs you should consider when shooting your next perfect photo. This round-up isn’t supposed to be the ultimate one – please feel free to suggest more useful articles in the comments to this post.
Among other things, we cover high-speed photography, tilt-shift photography, black and white photography, motion blur, infrared, night, smoke photography, macro photography, HDR, panoramic photography, RAW processing and others.
Hopefully, you’ll find many of the listed tutorials and how-tos useful for your regular work.
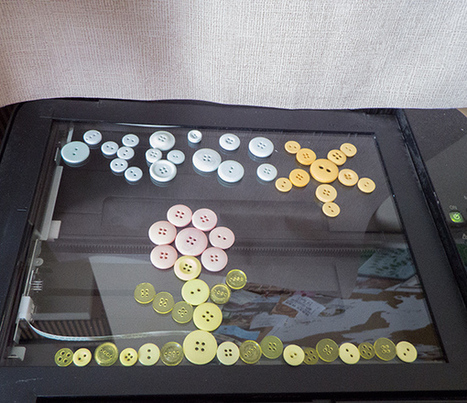
If you're into photography but don't have a great camera, or maybe if you just fancy something different, then scanography is a great technique to try. Scanner art, or scanography, is a fun and ethereal method of creating photograph-like art with your scanner.
1. Set Up Your Scanner Open the scanner’s properties (usually in devices and printers) Set up your scannerSet the dpi in your scanner settings
Make sure the resolution, or dots-per-inch (dpi), is set to the highest it can go. In the case of this example, 600 dpi. Be aware that some scanners, like mine, will reset the dpi after every scan so you may need to do this each time. Your colour format may be able to change and have weird and wonderful options. Feel free to experiment with those, but as my scanner is basic and boring I’ll demonstrate using the ‘colour’ option.
2. Set Up Your Image If you want a different background to your picture than the plain scanner one, you can stick your own on with Blu Tack. Next, add the items you want to include in your image. Remember that the image is being taken from below, so place things upside down.
It’s interesting that despite the lack of depth of field using this method, you can get some semblance of it by adding a background, because your scanner will focus on the item on its plate and not on the picture you’ve stuck to the top.
3.Get Arty
You don’t just have to position items on the scanner, why not try yourself… and no, I don’t mean sitting on the photo-copier at the Christmas party! Self-portraits can become ethereal and have an almost, underwater quality to them.
If you can draw (I can't!), try cutting out scenes and laying them on the scanner for some great silhouette effects. You don't have to have the lid down either, dragging something along the plate as it scans can give some really eerie blurring effects!
Conclusion
You might not have even realised you have a scanner, but many home printers include scanners now too. This method allows you to be creative, it's fun and can get some great results!
Have you ever taken what you thought was a great photograph, only to find it looks dull when you view it on your PC? If so, your monitor may be letting you down.
Inexpensive monitors suffer from a narrow color gamut, inaccurate colors, poor gamma reproduction and other visual flaws. A better screen won’t make you better photographer, but it can help you better judge the photos you’ve taken.
Here’s what you need to know when buying your first professional display.
Even the best camera is only as good as the photographer's skills. The "Where to Start" interactive chart guides beginners to learn about the basics of photography.
The flowchart format helps you make decisions about figuring out what you need, but the cool part is that most boxes are clickable. Click and you'll be taken to a YouTube video by AdoramaTV, explaining the concept in simple terms.
One simple activity you can do in your spare time is to find new ways to photograph everyday, plain things. Yup, the things you see or use every day; no models, no glamorous set-ups, no breathtaking locations. You don’t even need to do this with a fancy DSLR camera or have a significant amount of time. The lesson you learn can be achieved in 10 minutes once a week, using a $100 camera or a smart phone.
Your goal is to make something very plain look more interesting through your lens.
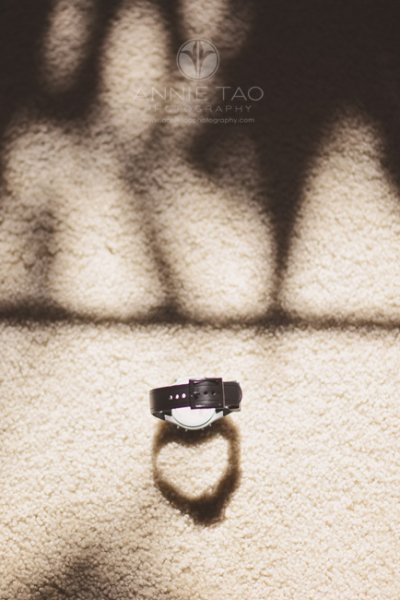
1. Pay attention to the shadows
If there is a lot of light, then there are probably shadows. Figure out if the shadows are helping the image or hurting it. If the shadows take away from the image, then make a change so that they don’t. The change could be a significant one, like moving your object altogether, or it could be a subtle one, like changing the angle you are shooting.
2. Look for natural patterns and shapes
If you can locate natural patterns in your shot or interesting shapes within the object or everyday scene, then you can shoot it in a way that highlights this.
3. Know where there is good light
If you can move the object, then place it in the light you want. That could be near a window if you are indoors, or in the shade, if you are outside when the sun is too bright. If you can’t move what you are shooting, then re-position yourself or angle of your camera.
4. Take a close-up shot of one of the key details
You don’t always have to photograph the full object or the entire scene. Figure out what are the key details and consider photographing just that.
5. If it opens, open it – if it moves, move it
Is it a chest? A book? A cookie jar? Photographing it opened will show the content and make the image more dynamic.
Doing this activity from time to time can help you discover new ways to photograph people, landscapes, or whatever makes your heart sing. You can give yourself a specific goal, like finding a particular shape, as I did in the example above, or give yourself a general goal of shooting an object with pizzazz in 10 minutes.
You’ve seen them appear in some of our earlier posts on freebies. But today we decided to put all the eBooks together (and many more!) in a single, mega post for you. These will keep you busy for a really long time. Go ahead, You’ve seen them appear in some of our earlier posts on freebies. But today we decided to put all the eBooks together (and many more!) in a single, mega post for you. These will keep you busy for a really long time. Go ahead, download them! Print them if you want to, or save them on your smartphone to read them on the go.
The internet is a wealth of information. So much information, in fact, that it can be a real pain trying to sort the useful from the not-so-useful. A simple Google search for “free photography ebooks”, for example, churns up well over 14 million pages. Sound overwhelming? Fortunately, we’ve done all the dirty work for you and compiled a list of 23 awesome ebooks to help you get your education on. And the best part of it is, they won’t cost you a single cent. Dig in!
In Part 2 we are focusing on the photo itself. There are many good tools to use when doing this sort of thing, but the three to keep in mind are the clone stamp, healing brush, and patch tool. Mom helps me get the details right as we re-create a lot of the photo.
Social media platforms seem to change their image sizes pretty much every time you login. And every time that happens, photographers everywhere have to scour the internet searching for the new sizes. You just know that facebook is going to CRASH your photo if you don’t feed it the exact right size.
Well, here’s some good news: Mainstreethost blog already did the leg work for you.
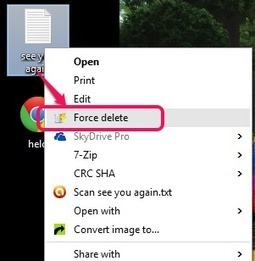
Wise Force Deleter helps you add any file that you aren’t able to delete, unlocks that file, and deletes it easily. Unlike other similar software, it is more convenient to use. Only three very simple steps are required to delete any stubborn file using this software. It is in beta version at present, but it worked perfectly during my testing.
If you find it too difficult to remove a stubborn file after many attempts, you can use this software to delete that particular file in just a few seconds. No more hassle and no more irritation. Whenever you get stuck and fail to delete a locked file, give a try to Wise Force Deleter.
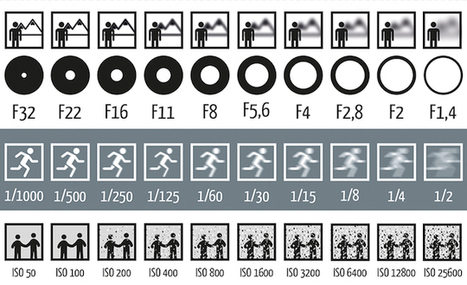
Learning even just the basics of photography takes a bit of work and one of the more complex ideas is the relationship between ISO, aperture, and shutter speed. German photography blog Photoblog Hamburg has a graphic explaining how it works.
The graphic does a reasonable job at explaining how the amount of light you let it affects a photo, how certain settings can increase noise, and how focus changes. The top section represents aperture, the middle shutter speed, and the bottom ISO. It’s not a perfect representation of exactly what you’ll get, but it’s a nice visualization that helps you understand the basics.
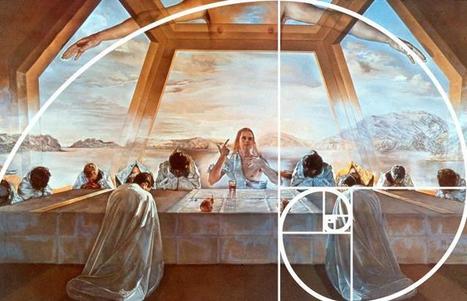
The Golden Ratio is the secret, silver bullet for refined design and balanced aesthetics. It’s on display in great works of art like the Mona Lisa. Even the Apple logo leans on the Golden Ratio for mathematical order . At least that’s what you’ve been told. FastCo Design’s John Brownlee has news for you, though: “It’s bullshit.”
Once you dig into the facts and the inconvenient truths of history, it’s rather clear that the Golden Ratio is a bit of a scam. In Brownlee’s words, “The idea that the golden ratio has any relationship to aesthetics at all comes primarily from two people, one of whom was misquoted, and the other of whom was just making shit up.” There’s also little hard psychological evidence to support the idea that humans prefer the look of designs that incorporate the Golden Ratio. But people believe it, because it makes them feel better .
To read the gritty details on the truth behind the Golden Ratio, click over to FastCo Design.
173 Sud's insight:
Here are 9 rules about basic photography composition from famed photographer Steve McCurry that will instantly make your pictures look better. You know some of them already—rule of thirds, etc.—but it's nice to see them illustrated with great pictures and be reminded of the most important rule of all: that you can—and should—break them.
Sharpening, as a post-process effect doesn’t really sharpen the images. It creates the illusion that it does, by exaggerating the edges, but it can’t bring back missed focus nor effectively negate motion blur. Yes, Photoshop has some deblurring options, some work better than the others, but nothing will replace getting the image nice and sharp in-camera.
So the sharpening does really just exaggerate the edges by locally increasing contrast along the edges that are masked (hence the unsharp mask). The edges affected are determined by the Radius and Threshold parameters when sharpening, and the amount of sharpening is adjusted using the Amount setting. If you want to see the sharpening in effect, check the picture below and see what I mean by increasing the contrast between edges.
Why Should You Sharpen an Image?
Regular sharpening, in moderate extents, is merely done to increase the punch that the details have, and to ease up the work the human eye needs to do to pick up the details. However, effective sharpening depends on the media and size of the image. Let’s see an example that demonstrates this.
If you were to sharpen an image with a resolution, say, 1600 x 900, and use unsharp mask with 150% strength and say 3 pixel radius, then downscale the image for web use to, say 600 x 338. Then the sharpening with 1.125 pixel radius (you downscale the radius with the same ratio to which you downscale the image) when downscaled will create artifacts (usually dependent on the downscale engine). Therefore, if you plan on downscaling, first downscale then sharpen for better results.
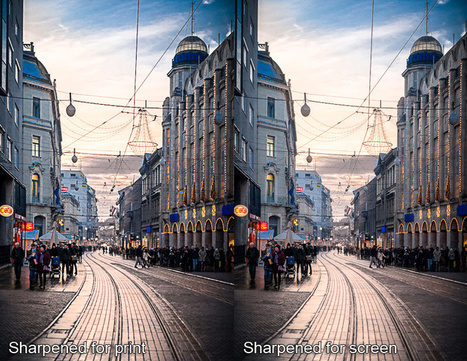
Sharpening for Screen vs. Sharpening for Print
Sharpening varies with where the image is used finally- that is, for viewing on a screen or for printing. Print generally requires a bit stronger sharpening, but it shouldn’t be overdone. If you start noticing halos or edges that have white/black outlines, then your sharpening is way too strong. The image below compares the two scenarios (click on the image for larger resolution).
Tips for Sharpening Your Photos Better
1. Many lenses, especially super-zooms, tend to lose sharpness on the edges while having a sharp center. When you sharpen an image like that you need to be aware of the issue, thus adjust your sharpening mask accordingly. I’m not aware of plugins that do the mask to the lens profile accordingly so you’ll have to do it manually by masking out the center and leave the effect more present towards the edges.
2. When you are creating HDR images, a lot of sharpening occurs in order to create that drama. Try not to overdo it, since HDR in itself with the tonal compression and all that mixing and matching introduces some halo, so if you add additional sharpening it will get worse and ruin the image completely.
3. Sometimes it is hard to notice the halo, especially if you have been staring at the screen for hours. Best thing to do is temporarily convert the image to monochrome and look away for few minutes. When you look back it should be easy to notice if there is any haloing or too much sharpening since there is no color to trick your eye.
4. Note that a wide and a large halo usually appears if you use too big sharpen radius with enough sharpening power. With small radius, something along the lines of fraction of a pixel to two pixel, the worst that can happen is to have outlines (that is technically halo as well, just it is small and gets noticeably visible with less sharpening power).
5. As you sharpen, as a downside of resolution, diagonal edges might appear jagged and blocky. Even zigzags often occur. Make sure you check for that as well and if you notice it happening try different settings, a bit larger radius with less strength or different threshold.
6. On an additional note, when you sharpen, you sharpen the noise as well. Therefore, clean the image first and sharpen later. If overdone, even an image that went through a noise filter will get exaggerated noise as well. I don’t know of any sharpening filter that doesn’t affect noise at all. You can reduce the effect by tweaking the threshold and masks, but it will never be perfect.
The key point of this article is to understand that sharpening won’t bring back missed focus, but it will create the illusion of focus and sharpness. The human eye is easily distracted, therefore if you overdo it, the sharpening becomes a distraction. And since sharpening can easily be overdone, especially if you sharpen for one size, then downscale to another. Keep your plugins under control, and keep in mind that sharpening can never replace proper focus.
Voici une sélection des meilleurs tutoriels gratuits pour Photoshop parmi tout ceux publiés ces derniers mois sur le web. Encore une fois, les auteurs de ces 35 tutoriels de qualité révèlent leurs secrets de création et vous permettront de connaître Photoshop sur le bout des doigts.
Réaliser toutes les créations qui suivent dans l’article sera bientôt facile et accessible grâce aux explications des tutoriels. La majorité sont textuels, certains sont en vidéo. Ils sont classés en plusieurs catégories car comme vous devez le savoir, l’utilisation qu’on peut faire d’Adobe Photoshop est extrêmement large. On a donc :
Retouche photo
Photomanipulation
Effets de texte
Dessin d’icônes
Webdesign et UX
L’accent a comme à chaque fois été mis sur la qualité du tutoriel, la clarté des explications et la variété des techniques utilisées. On peut dire que le nombre de très bons tutoriels ne faiblit pas ! Le niveau va d’intermédiaire à confirmé, je vous conseille donc d’avoir les bases requises pour utiliser les outils basiques du logiciel.
Trêve d’explications superficielles, à vous de suivre les liens suivants, de partager l’article s’il vous a plu et même de le commenter afin de dire quel a été votre ou vos tutos préférés ou encore pour en ajouter à la liste !
1 light, a few white walls or reflectors, a medium to long telephoto lens and limited depth of field are all you need to get the job done. Well of course a beautiful subject is important as well.
You may think that picking up a digital camera, turning it on, and taking the photo is all that you need to know about digital photography. Think again, as there is a whole heap more to learn that you might not even realize.
MakeUseOf proudly presents this free 59 page guide. It’s jammed packed full of useful information for all type of photographers – from beginners to advance photographers.
Inside, you will find everything from what digital camera is right for you to features and settings that you should know about your camera.
There are also 5 beginner exercises for you to complete to help you become a professional photographer, and helpful instructions and information about editing your photo’s to make them even more magical.
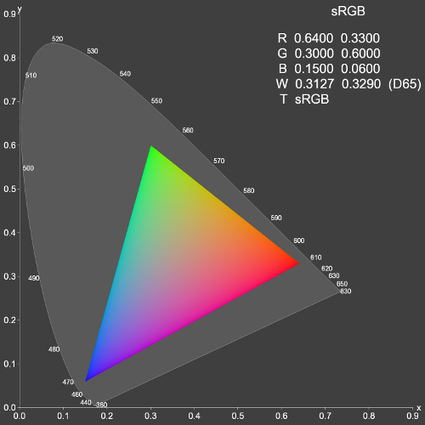
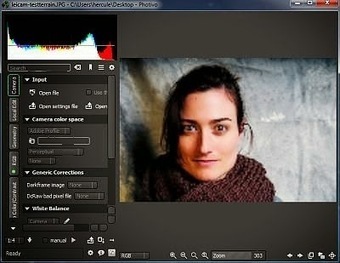
Ce logiciel est destiné aux photographes professionnels désirant une multitude d'outils pour traiter vos photos efficacement. Vous pourrez effectivement modifier la balance des blancs, le contraste, la géométrie, les couleurs, la texture, le niveau du bruit et bien plus encore à découvrir. On y trouve le diagramme colorimétrique de la photo désirée.
Photivo fonctionne sous Windows, Linux et Mac OSX.
Photivo is a free and open source (GPL3) photo processor. It handles your RAW files as well as your bitmap files (TIFF, JPEG, BMP, PNG and many more) in a non-destructive 16 bit processing pipe with gimp workflow integration and batch mode.
Photivo tries to provide the best algorithms available; even if this implies some redundancy. So, to my knowledge, it offers the most flexible and powerful denoise, sharpen and local contrast (fake HDR) algorithms in the open source world. (If not, let's port them ) Although, to get the desired results, there may be a quite steep learning curve .
Photivo is just a developer, no manager and no “Gimp”. It is intended to be used in a workflow together with digiKam/F-Spot/Shotwell and Gimp. It needs a quite strong computer and is not aimed at beginners.
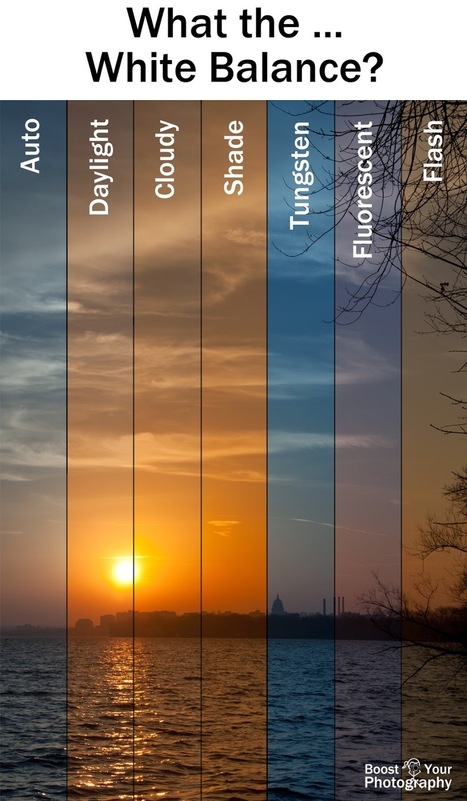
White balance is an often-overlooked aspect of photography. Many, many of us are guilty of simply adopting a "set it and forget it" approach to white balance, relying on auto white balance and our camera's ability to interpret a scene and choose an appropriate white balance. For many situations, your camera's auto white balance will do a decent job. But if you really want full creative control over your photograph, it is important to understand white balance and how to use it to truly capture the photograph that you are after.
What is White Balance? We tend to think of light as white, even though we have all seen the science demonstration of a prism and how white light is actually the full rainbow of colors. Our eyes look at a white piece of paper, and we see it as white, whether we are standing outside in full sun, in dappled shade, or indoors under fluorescent tube lights. Our cameras, however, are less flexible.
If you take a photograph of a white piece of paper, you may find that it looks white in daylight, blue in the shade, and yellow indoors. This difference is referred to the 'color temperature' of the light, and it is measured in K or Kelvins. If you want the whites in your photograph to look white, then you need to shoot with a white balance that matches the situation of the photograph.
The cloudy and shade white balance settings are considered "warmer" than daylight or tungsten, which means that they tend to bring out more orange and yellow tones in a photograph. Cloudy and shade settings can work extremely well during the 'Golden Hour,' the approximately hour-long period before-and-after sunrise and sunset, when the sun rays lend a much more golden tone to the morning or evening light. The cloudy setting is also popular with landscape photographs, as it can add a golden tone to non-golden hour photographs. Read a few landscape photography books, and you will find that many well-known landscape photographers use cloudy as their default white balance setting.
Indoor White Balance White balance can also make a huge difference with your indoor photographs. Common sources of indoor lighting (halogens, compact fluorescents, etc.) do not contain the full spectrum of white light, like sunlight, and often impart an awkward yellow tone to indoor photographs. Knowing the type of lighting you are using allows you to choose an appropriate white balance setting, like fluorescent, to compensate for this issue.
Online image editors do a great job when you're in a hurry or not at your own desk.
1. Pixlr
Pixlr Editor, one of the most full-featured imaging packages available, gives you a choice of how deeply you want to dive into your editing tasks. Pixlr provides a complete editing environment that’s reminiscent of Photoshop and Pixelmator. It has a main toolbar and features palettes like Navigator, History, and the all-important Layers.
Pros: Complete collection of sophisticated editing tools; several levels of complexity; excellent performance.
Cons: Pixlr Editor requires some image editing background.
2. Fotor
With its friendly, easy-to-use interface, Fotor offers five discrete photo enhancement utilities wrapped in one attractive package. In addition to classic photo editing, there are modules for creating collages, greeting cards, and HDR images. A new module, called Beauty, accompanies the selfie phenomenon to improve people portraits.
Pros: Easy to use; friendly and engaging; different craft opportunities available; good performance.
Cons: Flashing ads can be distracting; each operation must be completed before moving to the next edit.
3. PicMonkey
PicMonkey, a consumer-oriented online editor, conveniently lets you choose the output quality of the image right at the point of upload and, in primate motif, you can choose from Jack, Bubbles, and King Kong as shorthand for those quality levels. Each PicMonkey setting opens to additional controls that let you customize the edit, and you have to complete one task before moving to the next. A handy toolbar at the top lets you experiment freely with undo and redo.
Pros: Many cool artistic elements available; opportunity to customize output size.
Cons: Embedded premium services that you have to watch out for; flashing ads at the bottom of the window; must finish one operation before moving to another.
4. BeFunky
Despite its busy interface—mostly due to ads placed around the canvas window—BeFunky has so many sophisticated elements going for it from its Cartoonizer and Inkify paints and grunge frames, to its huge collection of stickers and backgrounds, that the brain halts in a snit of indecision. A humdrum photo is about to be transformed—and that is a good thing—but inevitably, you’re going to spend some quality time with BeFunky before sharing the final photo. And even then, you may go back to check one more thing. BeFunky’s built-in collage maker lets you add a number of photos in either preset or your own original patterns. It even has a Facebook cover to help construct your timeline photo.
Pros: An astronomical number of beautiful elements that boost the quality of your images; intuitive interface with many choices; built-in collage maker; good performance; just plain fun.
Cons: Garish page of ads support the free service.
5. FotoFlexer
After you load your image into FotoFlexer, you’re presented with a clean, tabbed interface featuring basic edits, effects, and animations, and the ability to beautify, distort, and decorate your images. Unique aspects, such as glittery text and object animations and distortion tools work well. There’s even an eyedropper tool that lets you choose and pull colors from the image to use with text—a sophisticated touch.
Pros: Clean, tabbed interface; many common editing choices.
Cons: Navigation sometimes gets confusing; must log in for some features.
6. LunaPic
LunaPic is a combination of old and new: Atop a deceptively conservative looking blue canvas with a too-small icon toolbar, sits and editor with a solid slate of unique photo edits. LunaPic has a distinct—let’s say Microsoft-inspired interface. It’s not especially elegant, and it’s stuffed pull-down menus that make for slow reading. As you start to experiment with special effects, there’s plenty of interesting material. Old Movie Effect animation, for example, makes a color photo black and white and adds moving vertical age lines throughout. Groovy Color gives you looping animations.
Pros: Offers a variety of video-style animated effects; decent performance.
Sumo Paint opens up to a Photoshop fascimile that provides a clean, non-distracting gray background complete with the most important palettes photo editors need to process their images. A full toolbar offers selection, painting, shapes, cropping, and transform tools, complete with zoom, eyedropper, and foreground/background colors. Menu bar pulldown menus include familiar Layers, Adjustments, and Filters. If you know Photoshop, then you’ll easily catch on to Sumo Paint.
Pros: Photoshop-like interface; good performance; familiar, sophisticated, and intuitive tools.
Cons: Many tools are only available with the paid version.
8. Photoshop Express
No roundup of online photo editors would be complete without the granddaddy of all image editing tools: Photoshop. Yet, free desktop-based online editing is not exactly Adobe’s forte. Photoshop Express has some strict limits on what you can edit: JPEG format and nothing larger than 16 megapixels. However, those restrictions take into account the vast bulk of point and shoot cameras and mobile shooting devices.
Adobe is famous for its elegant interfaces, and Express is no slouch in that arena. It offers the same cool, non-distracting dark background and an even cleaner layout than its flagship Photoshop app. Each tool offers a reasonable number of choices that you can preview just by moving your mouse.
Pros: Elegant; easy to use; doesn’t overwhelm with choices.
Cons: Decorate module lacks sophisticated elements; too few fonts for adding text (this is Adobe, after all); basic functionality, but limited compared with others in the genre.
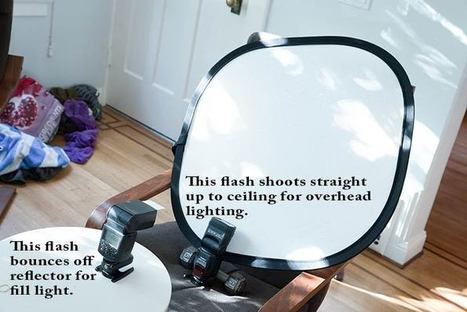
Even the youngest people look better with good lighting. The clamshell lighting scheme looks great and takes years off the face, but it requires heavy and bulky professional equipment, often best left to a studio setup.
This pseudo-clamshell rig, using two low-cost manual flashes and some white surfaces, produces a similar effect with minimal setup. Give it a try at your next family gathering, and you’ll come away with some beautiful, studio-like images of your family to share and print. With a little equipment and some MacGyvering, you can have much more than a snapshot to record that special gathering.
To get content containing either thought or leadership enter:
To get content containing both thought and leadership enter:
To get content containing the expression thought leadership enter:
You can enter several keywords and you can refine them whenever you want. Our suggestion engine uses more signals but entering a few keywords here will rapidly give you great content to curate.


 Your new post is loading...


How To Repair An Old Photo In Photoshop Part 1